Tuesday, August 23, 2011

Anticipations, Hips and Footwork

Anticipation and Hips
It is SUPER important to track the arcs of your hips. Your hips will dictate how the rest of the upper body, head and arms react. Use your video reference to spot out the ups and downs, lefts and rights.

In this video example I show how there is almost always an ANTICIPATION in every single move you do. If you try to step Screen Left you must move your hips Screen Right in order for the weight of your torso to lift off of the Screen left foot so that it can lift itself up. If you don't do this when you lift you foot up your balance will be completely off and you will fall. Because when we stand our weight is balanced perfectly on both feet. STAND UP AND TRY THIS ON YOUR OWN.  
(I learned this from Shawn Kelly's e-book from tips and tricks site: www.animationtipsandtricks.com)


This concept basically applies to every single move. If you want to lift your arm up, dip down a bit (anticipation) and then go up. If you want to step left, anticipate right and then go left. If you want to turn the head to the right, anticipate a tiny bit left before you go right.

KEY: All these anticipations are very small, and they all have nice little arc. (Well everything should have a nice arc, unless you are purposely dirtying up the arc) Be careful not to over do, unless you really want a build of energy or momentum. Of course with any rule, there are exceptions where you just want the arm to spring up. But it always feels soooo right when you have a tiny anticipation.


Footwork

Every time we do any move we are constantly throwing ourselves off balance and then recovering our balance.  When we do this, it's usually not a simple plant of the feet. They are usually doing all sorts of tiny adjustments and steps to regain the perfect balance. I KNOW it's hard to animate all these little steps, but it's absolutely ESSENTIAL! Don't fall into the common mistake of cementing the feet throughout your shot and your legs stretching like crazy to adjust to the hip moves.


Here is a video where I am doing a variety of moves, pay attention to all the little steps I have to take to regain my balance.

KEY: Don't be lazy and put in every single one of those footsteps you see in your video reference. Don't try to be slick and skip one or two, get them ALL:)

Feet Landing and Drag


Running Feet Landing


Side Note: Every rule can be broken, but you must fully understand these concepts before you can turn into a rebel animator.

Animation is super hard so take the time to sit back and enjoy your accomplishments in this crazy  field we all love.

Tuesday, August 2, 2011

Applying Theater concepts to Animation

So here are a few simple Theater concepts I learned while sitting in on a Theater Directing class at Florida International University.


1. Western/American audiences will always look at the Left side of the stage or the Left side of the screen first.
When observing many audiences researchers found that the first thing the audience looks at is the Left of the stage and then scans over to the Right side of the stage. They are not quite sure why, but they believe it has to do with the way we are taught to read from Left to Right. In Asian cultures it is reversed be the audiences will scan Right to Left, based on their system of reading.
What does this mean for animation?
Well that you area almost certain your audience will always scan your shot from Left to Right, so if you have something important for them to see put on the Left side of the screen. If you want to hold something back and reveal second place it on the Right side of the screen.
Ex: We are in a room where a man is considering canceling his wedding. You might stage a wedding cake on a table on the Screen Left and the character over by Screen Right. When the audience scans from Left they will see the wedding cake, and instantly know there is a wedding about to happen, then they will see the groom looking terrified over on Screen Right. Just like that you've told the audience a lot of information just from one glance.


2.  Movement from Stage Left to Right will always appear easier and more fluid. While movement from stage Right to Left will always appear as more of a struggle/hardship.
This concept has to do with the same concept as mentioned above, where Western/American audiences are more comfortable viewing Left to Right movement as we do it all the time when we read and view the world. So it's a bit more effortless for our brains to process.
When a character walks Stage Right to Left it feels a bit more uncomfortable, almost as if a wind was blowing in the opposite direction they are walking.
What does this mean for animation?
You can use this simple idea if you have a character who is struggling to something. Or with a character that feels completely at ease and happy with himself.

Ex: The groom is struggling with the idea of calling off his wedding. You might have him walk from Screen Right to Screen Left and have him place his wedding ring on the table (with the wedding cake) as if to say "I can't go through with it, I'm leaving."  You will be communicating to the audience in a very subconscious level.

Ex: Head Shakes: You can always make the timing faster when the head shakes Screen Left to Right and the timing slower when he goes Screen Right to Screen left. It's harder to go Screen Right to Screen left and now you've solved a timing and variation problem!


Ex: Jane Westmont is excited to have been promoted to head of Animation, so you set up your shot where she walks out of her supervisors office on the Screen Left and walks high as a kite on cloud 9 going towards Screen Right. 


You can apply this concept to many, many things. Enjoy it, it's a fun one :)


3. Status Swapping occurs all the time in theater and it's usually very graphic as the maid is cleaning the floors while the lady of the house is combing her hair upstairs.


The person who has the higher ground (head elevated, on a higher floor,ect..) always has the higher status. The person who is lower even if they are taller,  have their head bowed down and their shoulders hunched, to try to appear smaller because they have the lower status. It's basically a power struggle, whoever has the higher status has the higher power.


What does this mean for animation? 
 This is a very powerful tool that can be used in many ways in your animation. Status swapping is very crucial in storytelling as we always want the underdog to be victorious in the end. It's always interesting to watch character evolve and go from the house maid to the lady of the house through hard work and dedication. Audiences are always looking for that change in character!

Ex: A brother and sister are fighting in a room and the sister is curled up into a ball in the Screen Right Corner while the older/bully brother is looming over her. This tells us he has the higher status/the power, while the sister has the lower status. (Notice how the sister has to move Screen Right to screen Left, stand up and overcome her fears of her brother. It's a harder journey for her so going SR to  SL will appear to be more of a struggle to the audience) (On the opposite end the brother is bigger and he is going SL to SR with more ease because he has the power/status.)


Ex: You can also plan your cameras positioning with this idea as a camera looking up at a character will indicate the character has the highest status in the scene. While a camera pointing down at a character will indicate that character is pretty low in status/power. 


Ex: If you have an over the shoulder shot, you might place the character with the higher status on the top on the screen, while the character with the low status on the bottom of the screen. This could change as the scene progresses and the characters swap status, and now the character who was on the bottom of the screen is now on the top as the dominant high status character.


Notice in this video how the character are staged so that the male character is on the top of the screen, always taller and higher than the female. Until they swap status and then she dominates the top of the frame as she gains the higher status.


4. Small sticks of dynamite exploding  one by one until the big nuclear bomb explosion. This is a simple way of thinking of your scene as building up to it's final climax.
You can apply this concept in any scene or story. The main idea is that everything builds up little by little until the final climax.

Ex: A river is overflowing and the northern most bank has broken (explosion1)and a second river is now flooding into the main river. This happens 2 more times (explosion 2 and 3) until the main river is flooded and rapids are beginning to form from all the power of the excess water. All this extra water is creating enormous amounts of pressure on the Countries biggest dam. The pressure builds until it can't hold anymore and the entire dam explodes (Climax) and massive amounts of water and rubble shoot through the air creating a complete catastrophe.

Ex:  The groom is trying to cancel his wedding and he put his wedding ring down on the table (explosion1) , but then picks it up. He then  looks in the mirror and sees it on his ring finger and is terrified (explosion 2). His shock is so great he grabs the ring and throws it at the mirror (Climax) and sharp reflective pieces of glass go flying through the air as the ring falls and hits the ground with the broken glass.


In conclusion:

I hope these concepts have been helpful. There are hundreds more to learn and discuss out there. But, I can't recommend enough that you go and watch live theater. All forms of entertainment (theater, animation, dance, ect) all have many overlapping concepts. It's always beneficial to observe and take in as much as you can from every single form of entertainment.


So go out and branch outside of animation, and you will learn more than you can ever imagine!

Tuesday, May 31, 2011

Figuring it ALL out in your Video Reference

"Spend half your time planning your scene and the other half animating." -Ollie Johnston

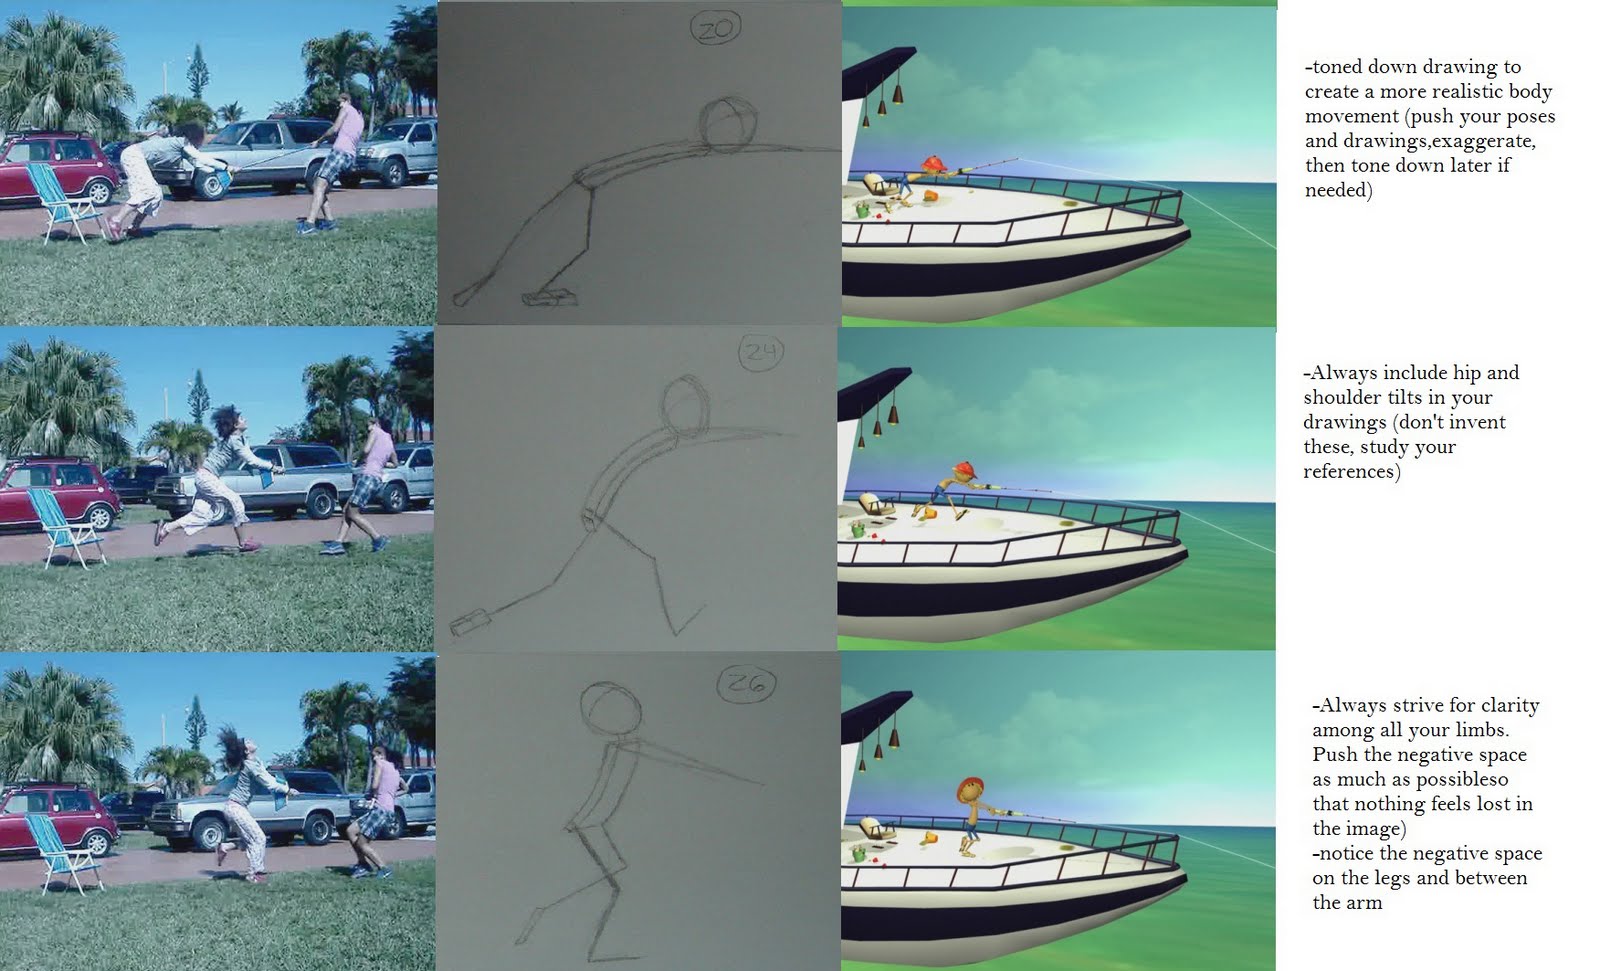
I'm going to break down my shot frame by frame so that you can see how close the final animation is to the video reference and planning. I always think you should have your entire shot in your video reference. In your drawings you refine the motions, poses and timing. In Maya you take your drawings and push the poses and timing to create your final work. Always advancing from you previous stage in your work-flow.

Fishing Shot Video Reference: 
Notice how I used multiple shots to create one final shot. I had a vision in my head and I created a rough video for it. Also pay attention to how the videos cut pretty well into each other. I am always conscious of what foot is stepping forward first when I do a new camera, so that my mechanics are always matched up. Keep a close eye on those details when shooting a variety of video reference.

Drawings:
Based off of the video reference above. 
Golden Poses-Tell your story in 3-4 poses. 
Key Poses- Super important poses needed to sell acting physicality.
Notice the difference between Golden Poses and Key Poses.


Phrasing: 
I even include a phrasing pass because a lot of the motions will be similar, so it is my job as animator to create an interesting rhythm to the shot. Very important in motions that repeat themselves, such as the pulling forward and back of a fishing rod. It's good to write down your phrases so that you can have an overall feeling of the rhythm of your shot.


Final Shot: 
Pretty close to the original video reference!

Frame by frame breakdown of all the elements above:


Subtle Acting examples:

Back-story:
I created a back-story before I did any video reference so that I understood the character thoroughly. Sort of like an actor doing his research on his character, but in my case I had to create the research so I could study it.

"Mother Hurt" Animation Backstory by Kelly Perez

   Thomas James was a wonderfully charming 10 year old boy. He was raised in a small upscale community, called Hartford. He had a younger brother which everyone affectionately called Timmy, and an older brother of 15 named Roger. They all live together with their mother Catherine, Grandmother Delores and his best friend in the world, his uncle Jim.
   What once was a perfectly happy home for Thomas has recently been flipped upside down and turned into a battlefield with the introduction of Mr. Malnestro. This new man in their lives is intended to marry his mother and become his new father.    Grandmother seems to think the world of Mr. Malnestro and his ohh so perfect upbringing. She feels they are a perfect match, and it doesn't hurt that Mr. Malnestro owns the largest estate in Hartford.
   While grandmother has already begun to prepare for the wedding, Uncle Jim sees Mr. Malnestro in a completely opposite light. He has had awful fights with both mother and grandmother over his true intentions, his questionable financial practices and most importantly his devotion to mother. These are certainly frightful nights in our once peaceful home and it seems as if things have taken a turn for the worse.  
   Grandmother has affirmatively asked Uncle Jim to leave the house stating he is a threat to their family’s future. It certainly doesn't make any sense to Thomas and the boys, but they do remember how terribly depressed their mother became after Uncle Jim ran off Mr. Holmes a simple southern man who intended to marry their mother a few years back. 
   Thomas can only suppose grandmother intends for the best possible outcome with Uncle Jim out of the picture and so with a sad heart Thomas runs out to see his beloved uncle and tries to console him as best a 10 year old can. "It isn't you uncle Jim, she just, she just doesn't want so see mother hurt anymore."

 Video Reference:
 
Planning:
Final Animation:


Two person acting shot example:


Video Reference:
Notice how my rough storyboard has very rough Golden Poses that tell the entire story in 3 or 4 panels. 
 
Drawings:
You don't have to be the greatest artist, just make sure you think of your character's emotions and you will be fine.


Final Animation:


I hope this blog posting has helped you understand the importance of planning. It is SUPER important to think of your animation as much as possible. Think of how the setting affects your characters, think of the emotions, think of the differences in personality of your characters, think as much as humanly possible. Animation is hard work, but once you put in a lot of the thinking in the beginning it will make the end of your work-flow easier. You have to put in the work at some point, why not get an early start on it :) 

Keep pushing your animation: this is hard work, but fun work!

Tuesday, May 17, 2011

Cameras

The first thing to note about this topic is: Every shot should aim to tell a story.
Now every rule can be broken and there might be moments where you don't quite have to do this. But it is still something very important to always consider.
 
A lot of my notes from today come from a variety of sources but most directly from the Director's commentary (Shekar Kapur) from his  film "Elizabeth." I highly recommend anyone to watch it and then watch the commentary.
Here are some questions he asked himself during the filming. Try asking yourself the folllowing:
- What is this scene about?
-What is the philosophy? (Philosophy-study of general and fundamental problems, such as those connected with existence, knowledge, values, reason, mind, and language)
-Why are we shooting it this way?
-How do you think it should be? (Ask other people what they think, feedback is essential!)


Basic Camera Shots
(I got these pics from this site, where you can learn more about these. Most of these are self-explanatory)
(http://www.mediacollege.com/video/shots/)

The key thing to remember when deciding what shot to choose is: what EMOTION is the shot evoking.
Extreme Wide Shot


Very Wide Shot


Wide Shot


Mid Shot

Medium Close Up


Close Up
Extreme Close Up
Over-the-Shoulder Shot
 
Point-of-View Shot


Cutaway Shot

Moving the Camera and Cutting

Moving the camera is something that film makers plan out very carefully, so take time to think about your camera moves. Always justify the movement and the cut. Another note to remember in the CG world is to think about your camera as it exist in the real-world, with weight. A camera weighs a lot so make sure your camera doesn't feel like it's floating around. If you are unsure of what to do, always keep it as simple as possible.

Cutting was best described to me as blinking. Imagine you are looking at your grandma's living room, you start at the left side, hear a noise at the window, and blink and are over on the right side by the window. You don't feel disoriented, your brain just doesn't need the information in the middle you just want to see what is by the window on the right side.  

Another way is to think of how we see the world around us.
Imagine you walk into a busy street market, you first take in the whole scene, then your eye is caught by a merchant on the right side juggling tomatoes, but then you look down the walkway and see the carrots which is why you came here. So you head in that direction, a few things might catch your eye so you look at them and then your arrive at the carrot stand.You can almost imagine your shots here,
1.A very wide shot of the entire market to establish the area, the length od the street ect.
2. A mid shot of the merchant juggling
3. A wide shot of the street but with the carrot merchants sign and the carrots attracting attention
4. A  cutaway shots of cucumbers in a basket
5. Another cutaway shot of a two birds in a cage
6. A mid shot of the Carrot merchant with a big smile ready to serve

Over the shoulder Shot with two people

These are some of the most common shots. One thing to remember is you don't always have to cut when the actor starts to talk, you can leave the camera on the actor listening. These are really great because you see what the character is feeling as they listen. Here is an example from Elizabeth, notice how towards the end the director has chosen to focus on Elizabeth and is just getting her reaction. (Note there is no audio, notice how everything is still super clear without audio)


Get Closer through Cuts

You can cut the camera so it gets progressively closer. This will intensify the moment as it feels like the stakes are getting higher and higher. Watch the example below, also no audio.


Camera Zoom
I often think zoom is used a bit much in CG Animation, so my biggest advice would be to be very subtle with it. Here is a nice example where it doesn't seem intrusive. 

Camera as an Actor:
Here is a nice example of the camera being an active participant in the scene as an actor. In this scene the camera is the ultimate interrogator in the scene. (No audio)


Showing Power:
You can use the camera to give the illusion of power. In the film Elizabeth Kapur is constantly following one of the main characters Norfolk. He is always walk somewhere and the camera is like as servant always following him, he is the one leading. This creates an element of Power and authority.

In Conclusion
Those were a few examples of what you can do with your camera. It also reveals a bit of the thought process the director used. This should push you to put this much thought and consideration into your shots. If all else fails, keep it simple :)

Monday, May 16, 2011

Improving your Animation OUTSIDE of the computer

Go Outside
Make a point to plan some sort of outdoor activity during the weekends. Hiking,beach, pool, snowboarding, build a snowman, plant some flowers, take your dog to the park, ect. 

Take a break every hour
I use this timer, you can download for free:

After every hour of working on the computer be sure to:
1.Stand up, walk around
2.Stretch
3. Look at object far away. When you sit in front of the computer your eyes are only working at looking at objects that are near. So when you look around it takes your eye a bit longer to adjust to farther distances. This can be a big problem in the future as your reaction time for your eyes to focus can be slower than most people.
4.Get a drink of water, hydration is very important
5. Don't forget to Blink, when we are on the computer we blink 15 times less than we normally do. If you wear contacts and they dry up, I recommend using artificial tear drops. There are many different types available at a lot of stores.


People Watching
The first thing to remember about people watching is that you will not remember every single thing you observe. So don't worry about it, just enjoy watching people smile, be scared, laugh, feel uncomfortable, ect.
When you are observing human behavior try to think of it critically. For example let's say you are sitting in a restaurant and someone looks like they are having a birthday party because a mom with a stroller has a giant stack of cups on the table. Now watch all the people that are invited, try to:
-guess who's birthday it is. How does she feel, happy, exhausted from welcoming everyone, nervous, ect.
-how do the guest know the birthday girl, family, friends, school crush, boyfriend, girlfriend, ect.

Observe the relationships people have with each other, with themselves and with the environment they are in. 


These critical question and guessing game you are playing in your mind will help you remember the essence of the moment and you will always keep that in your brain. As opposed to trying to remember tiny details, such as how the feet were, and how she tied her hair up.

Exercise
 Be sure to get some sort of exercise, at least two days out of the week. Go to the gym, go for a run, swimming, basketball, anything that will get you active. This will strengthen your muscles and relax your brain from all the million animation stresses running through your mind. Take this as your time for your mind and body.


In Conclusion
If you make it a point in your week to incorporate these simple ideas, your work will improve tremendously. Your brain and body will be healthy and relaxed. Your observations will help you understand your characters in your performances better. The sunlight and fresh air will remind you that life is not all about animating :)

Enjoy, be healthy, be creative and live life to the fullest.


Tuesday, May 10, 2011

Posing: Line of action, Negative Space and creating Variety

Explore poses for "Devastation" with a Line of Action:

Line of Action: Is a line that runs through your entire pose, from finger-tips all the way down to the toes. It captures the essence of your pose and it’s what you use to build your pose.


Now that we have explored some poses, let's jump into Maya and begin to pose:

**As a side note, making one single pose can sometimes take me 1-3 hours. Don't be afraid to spend the time and details necessary to make an amazing pose. Time invested in the beginning of your work-flow will pay off in the middle, end, and final steps of your shot**
This pose could be confused with a lot of things: His head hurts, he's bored staring at ants, he is stretching, ect. You want your poses to have one definitive super  CLEAR meaning.

Let's see how the line of action helped me create this clear pose that demonstrates "devastation."

Line of Action runs through the entire pose from head to toe.

 
Supporting Limbs follow echo the line of action. All the way down the right arm through the finger –tips. Same for the Right foot, follows the line all the way through the tips of the toes.
 
Reverse the line of action to help you pose out other limbs that don’t always have to echo line of action.


Now Let's see how Negative Space helped shape this pose.
Yellow areas are highlighting the negative space. They help separate certain parts of the body so that we can see them more clearly.
Notice the following:
1. Tiny bit of space between the torso and the head.
2. Tiny bit of space between the right leg and the right arm on the floor.
3. Space between the wall and the back of the torso
4. Space between the both legs
5. Space between the left knee and the top of the head.


Variation in your Poses
Finding variations in your poses is a very hard thing to accomplish, but all you have to do is use your brain. Think of ways of making the same exact pose slightly different. Think about all the many ways we sit in a chair: in the principals office, during jury duty, at a wedding, at a funeral, in a boring class, in an exciting class, in a class where you have a crush on your teacher, ect..
It's always best to think of your character and ask what they are experiencing at the moment, where are they at the moment, who are they with, is someone watching them, ect.  

Let's look at this example below where to woman are seated at a table with almost similar poses:
These two poses seem very similar, but there are difference. It's these small differences that reveal to us, the viewer, each woman's personality. 80-90% of all human communication is non-verbal! That means we are mostly communicating with our body or our POSES!

Notice the following things:
1. Woman on Screen Right has her legs crossed, this could mean I trust you but I am a bit guarded against you.
2. Woman on Screen Left has her fingers a bit more spread out, she feels more relaxed, this is probably her home, table and coffee.
3.Woman on Screen Left has a more upright back as well as her chin is up, revealing a higher status. She is the dominant character, she has better manners, she is probably more likely to be affected by what other think of her than the woman SR.
4. Woman SR has her head tilted down as she is being submissive, but her legs crossed shows she might be a  bit more submissive.

We are all body language experts, are brains can pick up even the most subtle gesture or facial expressions. Think of these elements critically in your poses and your characters will start to come to life before your eyes.

Hope this helps and keep pushing your poses, your observations, your mind and your animation will follow :)